Connect Device
HOW TO CONNECT DEVICE TO WHATSAPP
- Go to: Devices page
Click "Actions" button, choose "View Device" - You will see QR code if you have not connected to Whatsapp, you will see your Whatsapp profile picture if you are connected.
- Scan the QR code and wait until you see your Whatsapp profile picture.
Send Message
- Go to: Send Message page
- Select sender
- Input receiver (single or multi)
- Input message text
- Click "Send"
Phonebook
- Go to menu "Phonebooks" >> click on the "Add new" button to import from excel XLSX file.
Please download the sample XLSX file for guidance. - Go to menu "Phonebooks" >> click on the "PHONEBOOK DATA" to show the contacts >> click on the "Name"/"Phone" to edit contact.
Send Campaign
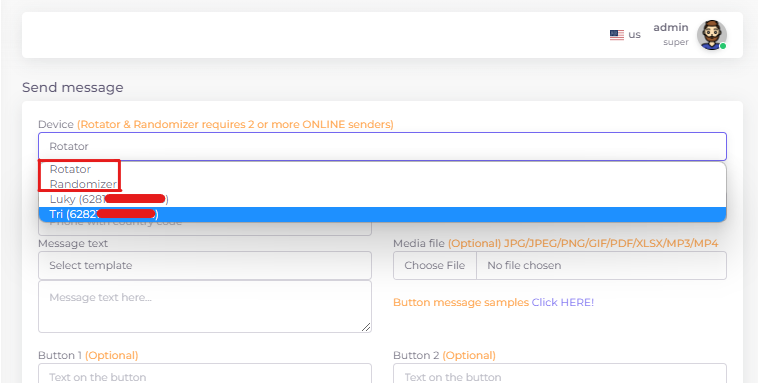
- What is Rotator?
If you have 2 or more sender devices, you can rotate the senders while you sending bulk messages.
The proccess: sender1, sender2, sender3, …., senderX, then go back again to sender1, sender2, ….until the job is done.
Send Poll
Use Send Message menu
- Go to Send Message menu
- Select sender
- Input receiver (single or multi)
- Message text:
{
"pollMessage": {
"name": "Poll message name",
"selectableCount": 1,
"values": [
"value 1",
"value 2"
]
}
} - Click "Send"
Use Autoreply menu
- Go to Autoreply menu
- Add new Autoreply
- Put keyword POLL (or any keyword you like)
- Put response like below:
{
"pollMessage": {
"name": "Poll message name",
"selectableCount": 0,
"values": [
"value 1",
"value 2"
]
}
} - Click "Save" to save
Save as message template
- Go to Templates menu
- Add new template
- Put template name
- Put in template msgtext like below:
{
"pollMessage": {
"name": "Poll message name",
"selectableCount": 0,
"values": [
"value 1",
"value 2"
]
}
}
Use POST API request, please go to menu "Rest API"
Send VCard
Use Send Message menu
- Go to Send Message menu
- Select sender
- Input receiver (single or multi)
- Input Message text like below:
{
"contactMessage": [
{
"fullName": "My Full Name",
"phoneNumber": "6281282667969",
"organization": "My organization",
"email": "email@gmail.com",
"url": "https://wachat.net"
}
]
} - Click "Send"
Use Autoreply menu
- Go to Autoreply menu
- Add new Autoreply
- Put keyword "sample vcard" (or any keyword you like)
- Put response like below:
{
"contactMessage": [
{
"fullName": "My Full Name",
"phoneNumber": "6281282667969",
"organization": "My organization",
"email": "email@gmail.com",
"url": "https://wachat.net"
}
]
}
Save as template message:
- Goto Templates menu
- Add new template
- Put name “sample location”
- Put message msgtext like below:
{
"contactMessage": [
{
"fullName": "My Full Name",
"phoneNumber": "6281282667969",
"organization": "My organization",
"email": "email@gmail.com",
"url": "https://app.wachat.net"
}
]
}
Send Location
Use Send Message menu
- Go to Send Message menu
- Select sender
- Input receiver (single or multi)
- Message text:
{
"locationMessage": {
"name": "Omar Palace",
"address": "Abu Dhabi",
"latitude": 24.232483,
"longitude": 55.692107
}
} - Click "Send"
Use Autoreply menu
- Go to Autoreply menu
- Add new Autoreply
- Put keyword LOCATION (or any keyword you like)
- Put response like below:
{
"locationMessage": {
"name": "Omar Palace",
"address": "Abu Dhabi",
"latitude": 24.232483,
"longitude": 55.692107
}
}
- Click "Save" to save
Save as template message
- Goto Templates menu
- Add new template
- Put name “sample location”
- Put message msgtext like below:
{
"locationMessage": {
"name": "Omar Palace",
"address": "Abu Dhabi",
"latitude": 24.232483,
"longitude": 55.692107
}
}
Spintax Campaign
- THE GOAL IS TO MAKE MESSAGES SLIGHTLY DIFFERENT FROM ONE ANOTHER IN 1 CAMPAIGN
Go to Send message menu and you can type multiple set of random words inside curly bracket.
Use { } to group and use | to separate the words or phrases.
Hi {name}, today we have a {hot sale | big promotion | weekend bazaar | extreme marketplace} event in your city.
Please contact our {sales | support | admin} for more information
{+964 771 934 3622 | +964 213 124 8374 | +964 449 332 0948 | +964 930 334 1033}
Unsubscribe Campaign
- HOW TO DO THIS FROM CUSTOMER SIDE?
By default if a customer typed "unsubscribe" to the bot, the bot will save to database and never send bulk messages to that customer again.
Every bot in the same user in Arrocy-WG will not send any bulk message to that customer, this is because Arrocy-WG have the multi sender feature, if only block 1 sender, other sender can still send bulk messages to that customer.
Every bot will still be able to send message to that customer, as long sending non-bulk messages.
*Sending with phonebook with less than 10 receivers or send messages that will finished in less than 30 seconds is NOT bulk-sending.
- THIS FEATURE WILL HELP YOU TO REDUCE WHATSAPP BAN
My suggestion is:
When you send out campaign, include this message at the bottom:
"Type 'unsubscribe' to remove yourself from our future campaign messages"
or you can create a button with your campaign message, put "unsubscribe" on the button id. - WHAT HAPPEN AFTER CUSTOMER UNSUBSCRIBE?
Customer's phone number will be saved in "subscriber" table with code "0", and every time you send campaign, it will be checked through this database. If found, send to this number will be skipped.
Meaning, you don't have to remove the unsubscribed customer's phone from phonebook, because Arrocy-WG will automatically skip the message to unsubscribed customers. - WHAT IF CUSTOMER CHANGED HIS MIND AND WANT TO RECEIVE CAMPAIGN AGAIN?
From customer side, just ask customer to type 'subscribe' to the bot
OpenAI ChatGPT
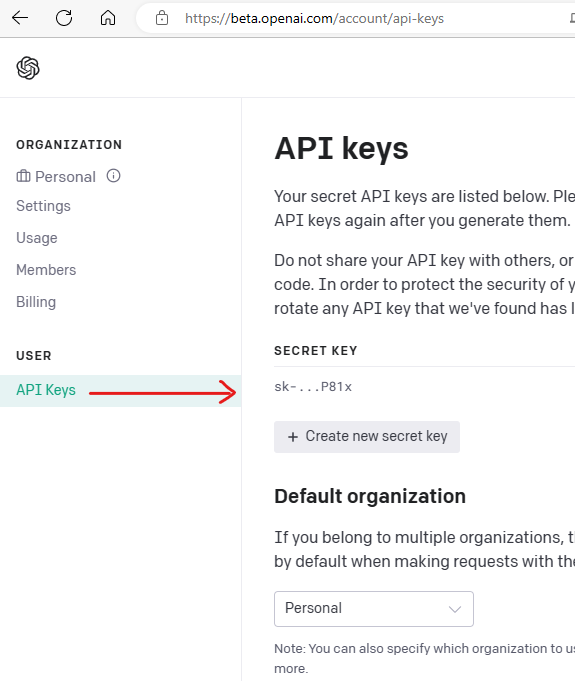
- How to get openai apikey?
Register a new account if haven't done so.
Then go to: Account API Keys – OpenAI API
- Where to insert openai apikey in Wachat Whatsapp Gateway?
- Will the chatbot remember our previous chat?
YES. I am proudly announce that start from this version, the chatbot can remember the chat history. - WARNING! The more history collected, the more token will be used. Please delete history regularly by button or by type "reset chat" to the chatbot.
- What is OpenAI persona?
This will be your chatbot personality/characteristics/attitude/behaviour, that you can set with your own sentence.
ex.: Your name is Marvin. You are a grumpy chatbot. You are reluctantly answers questions with sarcastic responses. - How to interact with openai chatGPT bot?
Call the chatGPT bot with the OpenAI Prefix (Bot).
Example to chat with the bot with device on the picture above:
"bot, what is openai chatbot?"
Chatbot Menu
THERE MUST BE a '0, main menu' (zero - comma - main menu) in the autoreply, you can add other keyword after the comma. This is to trigger the MAIN MENU.
THERE MUST BE a '9, back menu' (zero - comma - back menu) in the autoreply, you can add other keyword after the comma. This is to trigger the BACK MENU.
We are going to create level-0 (TOP) menu. Add new Autoreply from admin panel, insert keyword: '0, main menu, hello, olá, مرحبًا', response: Welcome to TravelLocco. Please select language: 1. English | 2. Portuguese, then SAVE.
Now we are going to create level-1 menus.
add new autoreply, keyword: 1, response: Please select Department: 1. Sales | 2. Brochure | main menu | back
add new autoreply, keyword: 2, response: Por favor, selecione o Departamento: 1. Vendas | 2. Folheto | main menu | back
Now we are going to create level-2 menus.
keyword: 11, response: Please select Continent: 1. Asia | 2. Africa | 3. Australia | 4. America | 5. Europe | main menu | back
keyword: 12, response: Please select destination: 1. Tokyo 5/4 nights Disney adventures | 2. Bali 7/6 nights Paradise adventures | main menu | back
keyword: 21, response: Selecione o continente: 1. Asia | 2. Africa | 3. Australia | 4. America | 5. Europe | main menu | back
keyword: 22, response: Selecione o destino: 1. Tokyo 5/4 noites aventuras da disney | 2. Bali 7/6 noites aventuras paradisíacas | main menu | back
Now we are going to create level-3 menus.
keyword: 111, response: ???
keyword: 112, response: ???
keyword: 113, response: ???
keyword: 114, response: ???
keyword: 115, response: ???
keyword: 121, response: ???
keyword: 122, response: ???
keyword: 211, response: ???
keyword: 212, response: ???
keyword: 213, response: ???
keyword: 214, response: ???
keyword: 215, response: ???
keyword: 221, response: ???
keyword: 222, response: ???
Now you get the idea. The deeper the level, the more numbers will be.
Customer just need to type 1 digit number on each level of the menu.
Example customer type '0' to the bot, then customer will see welcome menu and please choose language.
Customer type '1', then customer see 5 new menus to select Continent.
Customer type '5', to select Europe.
Customer can type '0' to go back to main menu or '9' to go back 1 level at any level of the menu.
Welcome Message
How to make a Welcome Autoreply Message if there is no keyword matched?
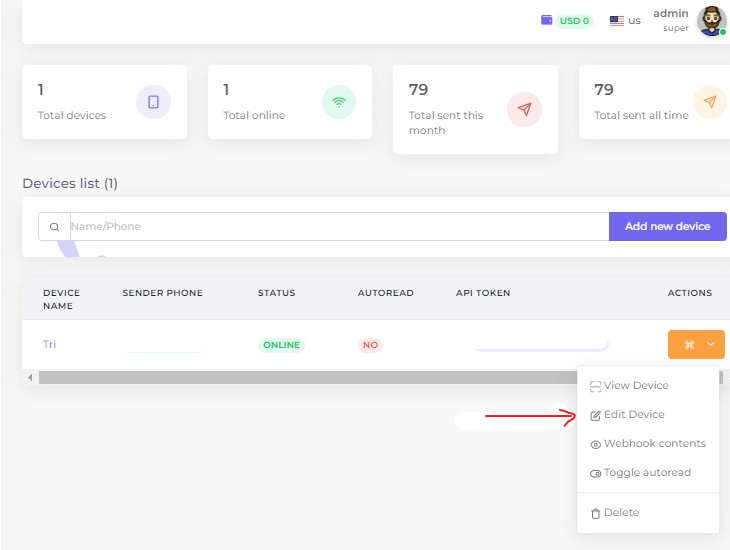
- Go to menu "Devices"
- Click "Actions" button, then Edit
- Input "Welcome Message" on the textbox
- Put "Hi {name}, Welcome to my shop. Please choose a menu provided below!"
1. Make an appointment
2. Pre-sales inquiry
Main menu
Back
- This Welcome Message will pause for 24 hours.
OpenAI Image Generation
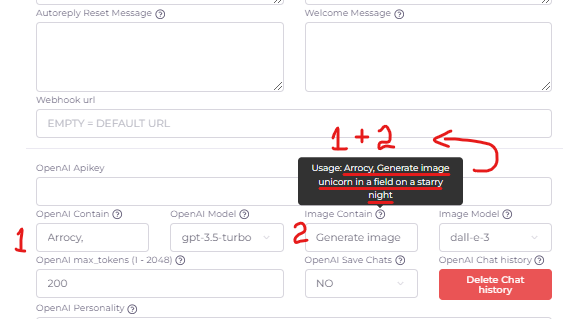
HOW TO SET?
- Go to menu Devices → Edit
- OpenAI contain: wachat,
- Image contain: generate image
HOW TO USE?
- arrocy, generate image unicorn in a field under a starry night
Send List Buttons
Use Send Message menu
- Go to Send Message menu
- Select sender
- Input receiver (single or multi)
- Message text:
{
"listMessage": {
"title": "List message title",
"description": "Message description",
"footerText": "Footer text",
"buttonText": "Button text",
"sections": [
{
"title": "Section 1",
"rows": [
{
"title": "Row 1",
"description": "Row description 1",
"rowId": "rowId1"
},
{
"title": "Row 2",
"description": "Row description 2",
"rowId": "rowId2"
}
]
},
{
"title": "Section 2",
"rows": [
{
"title": "Row 1",
"description": "Row description 1",
"rowId": "rowId3"
},
{
"title": "Row 2",
"description": "Row description 2",
"rowId": "rowId4"
}
]
}
]
}
} - Click "Send"
Use Autoreply menu
- Go to Autoreply menu
- Add new Autoreply
- Put keyword sample list (or any keyword you like)
- Put response like below:
{
"listMessage": {
"title": "List message title",
"description": "Message description",
"footerText": "Footer text",
"buttonText": "Button text",
"sections": [
{
"title": "Section 1",
"rows": [
{
"title": "Row 1",
"description": "Row description 1",
"rowId": "rowId1"
},
{
"title": "Row 2",
"description": "Row description 2",
"rowId": "rowId2"
}
]
},
{
"title": "Section 2",
"rows": [
{
"title": "Row 1",
"description": "Row description 1",
"rowId": "rowId3"
},
{
"title": "Row 2",
"description": "Row description 2",
"rowId": "rowId4"
}
]
}
]
}
} - Click "Save" to save
Save as message template
- Go to Templates menu
- Add new template
- Put template name
- Put in template msgtext like below:
{
"listMessage": {
"title": "List message title",
"description": "Message description",
"footerText": "Footer text",
"buttonText": "Button text",
"sections": [
{
"title": "Section 1",
"rows": [
{
"title": "Row 1",
"description": "Row description 1",
"rowId": "rowId1"
},
{
"title": "Row 2",
"description": "Row description 2",
"rowId": "rowId2"
}
]
},
{
"title": "Section 2",
"rows": [
{
"title": "Row 1",
"description": "Row description 1",
"rowId": "rowId3"
},
{
"title": "Row 2",
"description": "Row description 2",
"rowId": "rowId4"
}
]
}
]
}
}